监听前端路由改变
在本文中我们首先探讨了通�用路由的监听,文章后部分将会探讨框架的监听问题,由于框架过多,所以没办法一一补足,如果您有其他框架的处理经验欢迎补足
监听前端通用路由改变
通常来说如果是单页前端页面的话,如 vue 等,都会在首次加载之后浏览器的路由交由前端进行控制,这样可以提高用户的体验,并且极大的节省服务器资源
history 的监听
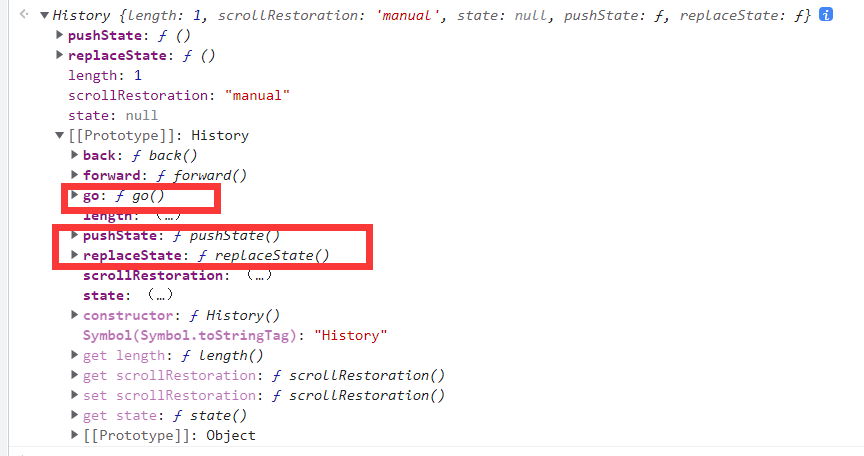
在 history 模式的时候都会使用
pushState,ReplaceState,go 函数等
这里给一个 pushState 函数的劫持
let originPush = history.pushState;
history.pushState = function (...arg) {
  console.log("改变了路由");
  return originPush.call(this, ...arg);
};
可以看到了路由的改变提示

我们可以以此类推,对这三个函数进行劫持,有些网站还会对这些函数做进一步封装,如 b 站就对这些函数做了封装
但是对于我们来说劫持哪个函数并不重要,因为无论劫持的是哪个 pushState,最后都一定会经过我们的函数,所以我们无须在意
hash 的监听
以 vue 源码为例,在里面我们可以看到
var eventType = supportsPushState ? "popstate" : "hashchange";
window.addEventListener(eventType, handleRoutingEvent);
supportPushState 是根据浏览器的一些环境判断来使用 popstate 和 hashchange
我们写脚本的时候不如暴力一点,直接全部监听上即可
监听 Vue 路由改变
如果你没有一定的逆向基础和框架源码的阅读基础,可能无法看懂,可以跳过本章继续向后学
我们本节课目标监听 vue 的路由跳转改变,地址是猫:走路,我们是认真的!
Vue 路由分类
Vue 的路由是由 Vue-router 来进行控制的
分为三种 history、hash、abstract 模式
history 就像
https://www.bilibili.com/video/BV16z4y1o7Mr/?spm_id_from=333.788.recommend_more_video.1
这种,是不带用#符号的,叫历史路由
而如果是 hash 模式,是带有#符号的
地址如 http://localhost:8082/#/
而 abstract 模式普通开发还不怎么常用,以后我们再跟大家聊。
问题
问题来了,我们如果想监听地址的改变,到底应该怎么做呢?
目前来说有两种方法,第一种就是根据 hash 模式以及 history 模式的路由跳转进行相应的监听,就是我们前文提供的方法
但如果我们想触及框架获得一些有关于框架的特殊能力,就需要分析框架的源码了,首先观察vue-router 官方手册

我们想使用的是后置钩子
router.afterEach((to, from) => {
  sendToAnalytics(to.fullPath);
});
我们观察vue-router 源码
VueRouter.prototype.afterEach = function afterEach(fn) {
  return registerHook(this.afterHooks, fn);
};
然后看 registerHook
function registerHook(list, fn) {
  list.push(fn);
  return function () {
    var i = list.indexOf(fn);
    if (i > -1) {
      list.splice(i, 1);
    }
  };
}
大概阅读一下,可以看到是对 list 插入一个函数
而 afterEach 插入的是 afterHooks 数组
我们搜索 afterHook 数组
翻阅源代码,找到是在 vue-router 实例初始化的时候拿到的
var VueRouter = function VueRouter(options) {
  if (options === void 0) options = {};

  {
    warn(
      this instanceof VueRouter,
      "Router must be called with the new operator."
    );
  }
  this.app = null;
  this.apps = [];
  this.options = options;
  this.beforeHooks = [];
  this.resolveHooks = [];
  this.afterHooks = [];
  this.matcher = createMatcher(options.routes || [], this);

  var mode = options.mode || "hash";
  this.fallback =
    mode === "history" && !supportsPushState && options.fallback !== false;
  if (this.fallback) {
    mode = "hash";
  }
  if (!inBrowser) {
    mode = "abstract";
  }
  this.mode = mode;

  switch (mode) {
    case "history":
      this.history = new HTML5History(this, options.base);
      break;
    case "hash":
      this.history = new HashHistory(this, options.base, this.fallback);
      break;
    case "abstract":
      this.history = new AbstractHistory(this, options.base);
      break;
    default: {
      assert(false, "invalid mode: " + mode);
    }
  }
};
我们可以看到初始化部分
this.app = null;
this.apps = [];
this.options = options;
this.beforeHooks = [];
this.resolveHooks = [];
this.afterHooks = [];
那我们的目标非常简单,找到 vue-router 实例,对其 afterHook 投入一个函数,目标就搞定了,那我们该怎么找到 vue-router 实例呢
这里可能需要大量的学习,所以这里我直接给出答案了
vue-router 源码在
Object.defineProperty(Vue.prototype, "$router", {
  get: function get() {
    return this._routerRoot._router;
  },
});
对 vue 的原型定义了一个$router,返回了 vue-router 实例,任何的 vue 实例都可以访问这个对象
那我们该怎么拿到 vue 实例呢?通过__vue__
可以参考Vue初探与代码分析
一般页面的#app 是一个根路径,通常存在__vue__属性,所以我们直接
document.querySelector("#app").__vue__.$router.afterHooks.push(() => {
  console.log("路由发生改变");
});
通过 vue 拿到 vue 实例,通过$router 拿到 vue 路由对象,然后找到全局后置路由钩子,投入一个函数来进行监听

可以看到监听成功!